Popp
Z-Wave CO Detector
SKU: POPE004407


Quickstart
This is a
Pressing the "Z-Wave button" for one second adds (includes) and removes (excludes) the device from/to the Z-Wave network.
Important safety information
Please read this manual carefully. Failure to follow the recommendations in this manual may be dangerous or may violate the law. The manufacturer, importer, distributor and seller shall not be liable for any loss or damage resulting from failure to comply with the instructions in this manual or any other material. Use this equipment only for its intended purpose. Follow the disposal instructions. Do not dispose of electronic equipment or batteries in a fire or near open heat sources.Product Description
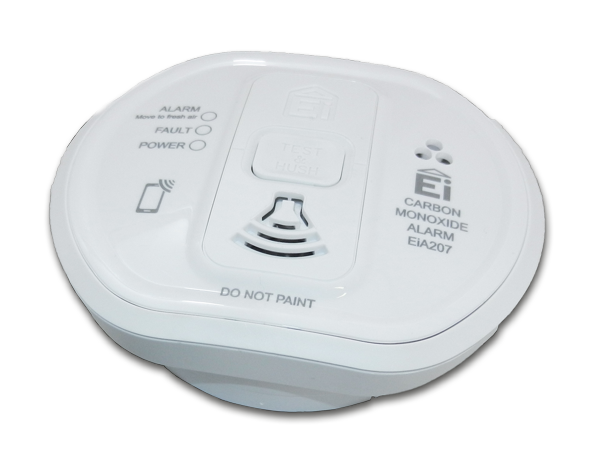
This product combines a certified carbon monoxide detector with a plug-in Z-Wave module to form a wirelessly reporting carbon monoxide sensor. The high-end carbon monoxide detector offers a test button conveniently accessible even with a broom stick when mounted on the ceiling. Three colored LEDs on the device indicate Alarm, Error and Battery Level. The Alarm conditions is reported wirelessly using Z-Wave. Beside the Carbon monoxide danger alarm the device will also report a tamper alarm if the sensor is removed from the mounting base. The device is a secure Z-Wave Plus device and can be used in one wireless Z-Wave network with other certified devices regardless of origin and brand.
Installation
Please refer to the installation guide of the carbon sensor attached for information about how and where the carbon monoxide sensor should be installed. Please note that the carbon monoxide sensor will also work stand-alone even if no Z-Wave network is present

- 1. The first step is to mount the mounting base on the desired place in the home using screws.
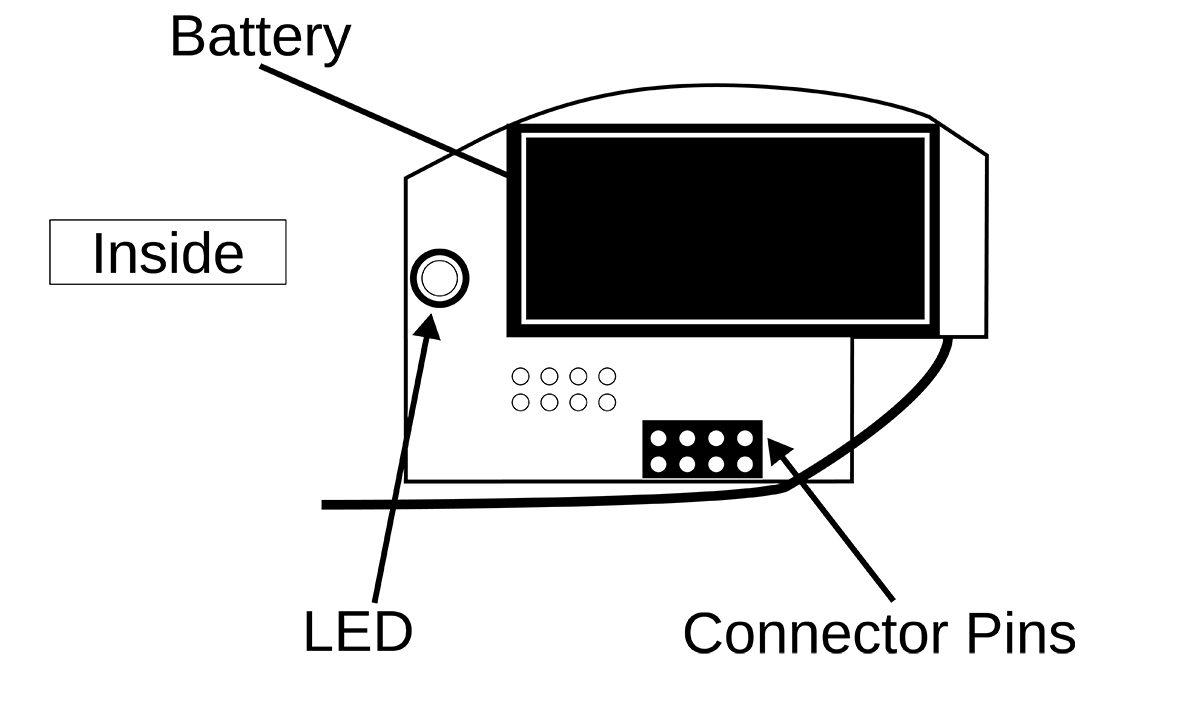
- 2. Remove the battery isolation strip from the wireless module. The red LED will start blinking.
- 3. Include the sensor into your existing Z-Wave based smart home network using the Z-Wave button.
- 4. Place the detector on the mounting base and turn clockwise. Now the detector is armed.
- 5. Battery change: The battery of the wireless module will be empty much earlier than the 10 years soldered in battery of the sensor. To replace the battery, remove the detector and pull off the wireless module from the carbon sensor. Then you can replace the 1/2 AA battery and re-plug the wireless module.
Product Usage
Operating the Device
There is no defined level of carbon monoxide that will result in an alarm. The danger of CO is a result of the total level of CO in the air plus the duration of exposure. A Z-Wave alarm will be sent out when one of the following conditions were met:
- CO level above 43 ppm for a duration of 60 minutes
- CO level above 80 ppm for a duration of 10 minutes
- CO level above 150 ppm for a duration of 2 minutes
The alarm will be sent to the central controller. Additionally, the alarm can be used to switch any other Z-Wave controllable actuator such as a Switch, a Dimmer or even a Door Lock that is placed in association group 2. The wireless module will also report a low (wireless module) battery warning. Please note that the battery level of the main detector is not reported since this battery can?t be replaced anyway.
Support for Command Class BASIC
The device supports the generic Z-Wave command class BASIC. The device will ignore any SET command but return the status of the sensor on a GET command (triggered=0xff, idle=0x00).
Alarm Messages
The device will issue the following (unsolicited) alarm messages:
- CO Danger Detected (this message will also be issued when the test button is pressed)
- Low Battery Alarm (when the battery of the wireless modules goes low)
- Tamper Detected (ON, when the CO detector head is removed from the base; OFF, when the detector head is mounted to the base)
- Malfunction (issued, when the detector main head detects a malfunction of CO detection)
| Reset to factory default | Keep The Z-Wave Button pressed for 10 seconds. the LED wil start flashing after 5 seconds |
| Inclusion | 1. Remove the ceiling bracket. |
| Exclusion | 1. Remove the ceiling bracket. |
| NIF | Single Click the Z-Wave Button on the bottom side module |
| Wakeup | Single Click the Z-Wave Button on the bottom side module |
| Protection | XXXProtection |
| FirmwareUpdate | Once the firmware update process has started (wakeup first by single push of the Z-Wave button) double click the Z-Wave button to confirm firmware update process. |
| SetAssociation | XXXSetAssociation |
Association Groups:
| Group Number | Maximum Nodes | Description |
|---|---|---|
| 1 | 10 | Lifeline |
| 2 | 10 | Switching Command when Alarm |
Configuration Parameters
Parameter 1: Value of ON-Command
Size: 1 Byte, Default Value: 99
| Setting | Description |
|---|---|
| 0 - 99 | Send Basic Command by set Alarm |
Parameter 2: Value of OFF-Command
Size: 1 Byte, Default Value: 0
| Setting | Description |
|---|---|
| 0 - 99 | Send Basic Command by reset Alarm |
Technical Data
| Dimensions | 0.1040000x0.1190000x0.0430000 mm |
| Weight | 185 gr |
| Hardware Platform | ZM5202 |
| EAN | 0019962004407 |
| IP Class | IP 20 |
| Battery Type | 1 * CR14250 |
| Firmware Version | 01.00 |
| Z-Wave Version | 04.05 |
| Certification ID | ZC10-16035025 |
| Z-Wave Product Id | 0x0154.0x0004.0x0003 |
| Frequency | Europe - 868,4 Mhz |
| Maximum transmission power | 5 mW |